Did you see my Runes Mini Cooker last week? Well he needed an oven glove and some bits of felt food aswell so here’s how I did it.
Oven Glove
First up you need to draw roughly around the child’s hand, as it’s an oven glove it doesn’t need to be a perfect fit. Rune is only 2 and small for his age so this step is vital for a custom fit. If you are making as a gift or other reasons you could use a glove instead. (1). Don’t forget to roughly mark where the thumb is.
You can then straighten up your lines to make it more glove like and neater (2). I included measurements on mine so if you’re struggling you can see how big mine was for a 2 year old. (3).
Using your new template cut out 4 gloves, make sure 2 are mirrored which is easily done by folding your fabric and cutting out 2. Sew round both from bottom edge up and around to the thumb then around that and down (4). In one glove leave a gap on the side that has no thumb, this is your lining.
Turn your outer glove the right way (5) and place inside the lining then sewing around the top edge (6). You will now pull out the outer glove and turn the lining the right way out using the gap you left in the side (7). You should have a funny looking double glove (8).
You can then fold under the gap edges and sew closed using a straight stitch or you can hand sew it closed. Place lining inside the glove and iron. You may wish to top stitch the wrist edge but ironing it flat is fine. Here is the nearly birthday boy with his oven glove. As you can see it fits great.
Bacon
So first up you need to draw a kind of bacon shape. Most tutorials you see are for the rectangle rashers but we have bacon that is like this so I wanted to recreate this. It sort of looks like a mini shoe but I have again included measurements for you. You could could even zoom in and print the picture as your template. (1). Sew the two pieces together along the curved in edge but leave the other side unsewn (2). Set your machine to do a satin stitch (tight zigzag). Start off thin then slowly increase the width whilst sewing up the left edge (3).
This is in hope of resembling fat. You can create a little design too.
Egg
First up use a compass to draw a small circle. Mine is labelled 3 cm but when making it I found a 4 cm circle is best. I then used the inside of a sellotape roll for the egg. I then drew a rough shape around for the egg white. Cut out the smaller circle in yellow for the yolk and 2 in white of the bigger shape.
Place the yellow circle in centre of one while and sew. Place the second white underneath and sew close to the edge, trimming the edges slightly to neaten. Eggshellent (sorry!!)
Pasta
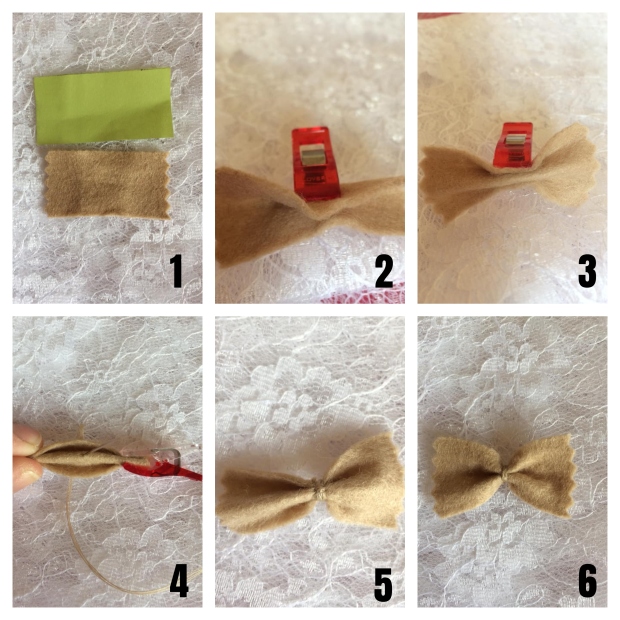
You will need a template for this mine is 5 cm wide by 2.5 cm high.
Cut as many of these as you want for your pasta. You will then need pinking shears or small scissors to cut the edges off into a zigzag. (1). Fold your shape in half lengthwise (2) then fold the edge back down to the folded edge (3). You should end up with a concertina effect.
Knot a needle up with similar shade of thread. I threaded it so there was 4 strands and place the needle about half way (4). Wrap the thread around the middle and secure at the back of the pasta (5). You now have one pasta shape which you can repeat (6). Once you get started it’s not too bad and a nice quick project.
I’m just a little pleased with this set and goes to show what you can make quite cheaply but still create a fantastic useable gift.


